
User guide › M-Pesa and other connections (owner)
M-Pesa and other connections (owner)
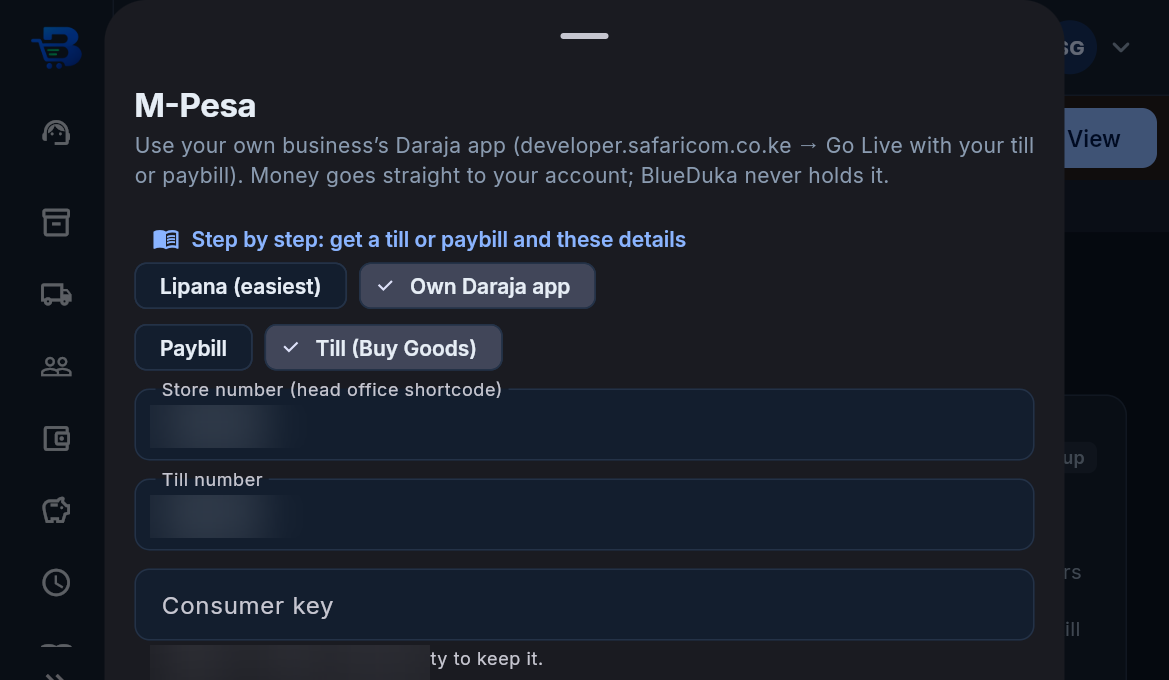
Until M-Pesa is connected, the app says so at the checkout with a How to set it up button that opens these same steps. Staff are asked to tell the owner.
M-Pesa (your own till or paybill), Business plan and above. Done once; money goes straight to your account.
- Get a Business Till or Paybill from Safaricom: apply on M-PESA for Business (m-pesaforbusiness.co.ke) or at a Safaricom shop. Have ready the administrator's ID, your KRA PIN, business registration certificate or permit, a bank letter or cancelled cheque, and a Safaricom line in your name. You get a Store number and Till number (Buy Goods) or a Paybill number, and M-PESA business portal access for your administrator. Pochi la Biashara and personal numbers can't be connected.
- Open a free Daraja account at developer.safaricom.co.ke.
- Go Live in Daraja: enter the Store number (till) or Paybill number, your business name and the username of your M-PESA portal administrator, then the one-time code Safaricom sends to the administrator's phone. Choose M-PESA Express (Lipa na M-PESA Online) and C2B.
- Copy your keys: Daraja > My Apps > your live app gives the Consumer Key and Consumer Secret; Safaricom emails the Passkey to your administrator (if not, ask apisupport@safaricom.co.ke). Keep them private.
- Connect in BlueDuka: Integrations > M-Pesa till / paybill > Own Daraja app > Live; choose Till (Store number and Till number) or Paybill (Paybill number); paste the three keys; switch on; Save. Payments then appear at the checkout by themselves.
- Test: sell KES 10, choose M-Pesa > Ask the customer to pay, and pay with your own phone.
- No Daraja approval yet? Choose Lipana in the same screen and paste your Lipana secret key instead.
Airtel Money
- Easiest: Airtel Money (and T-Kash) customers can pay your M-Pesa till or paybill directly from their Airtel menu. It reaches you as a normal M-Pesa payment, so with M-Pesa connected it is confirmed by itself (choose M-Pesa at checkout). Safaricom charges the till a small fee on these (currently 0.5%, at most KES 200).
- Or get your own Airtel Money till at an Airtel shop (usually ID, KRA PIN and business registration or permit), then save it in Integrations > Airtel Money. Cashiers see it at checkout and it prints on invoices. At checkout choose Airtel and type the transaction ID; check the message on your Airtel line first (not confirmed automatically).
Bank and card
- Save your bank name, account name, account number, branch and your bank's M-Pesa paybill in Integrations > Bank & card. Customers then see where to pay at checkout and on invoices (How to pay), with the receipt or invoice number as the reference.
- Customers pay by transfer or PesaLink, by M-Pesa to your bank's paybill with your account number, or by card on a card machine (PDQ) from your bank. At checkout choose Bank or Card and type the reference or approval code; check your bank's message or app before handing over goods for a transfer.
KRA eTIMS (optional), Business plan and above. Only if your business needs it: nothing about KRA shows in BlueDuka (receipts, settings, reports) until you connect it here. Once connected, every sale goes to KRA by itself in the background. Done once per branch, with your shop's own KRA registration: you apply to KRA yourself and KRA decides whether to approve it. BlueDuka is not a KRA-certified eTIMS integrator. Full guide: blueduka.co.ke/kra-etims.
- Have your KRA PIN and iTax password (itax.kra.go.ke).
- On the eTIMS portal (etims.kra.go.ke; the test portal is etims-sbx.kra.go.ke), choose Sign Up with your PIN, then Service Request > eTIMS and pick OSCU (Online Sales Control Unit), the type for businesses that sell with their own software (not eTIMS Lite or the Client app). Upload KRA's eTIMS Commitment Form.
- When KRA approves (by SMS), note the device serial number and your branch id (head office is usually 00). If KRA also gave you API keys (Consumer Key and Secret), keep them.
- Connect in BlueDuka: Integrations > KRA eTIMS: tick that the registration is your shop's own, enter the KRA PIN (it is then printed on your receipts and invoices), branch id, device serial (and API keys, if any). Test first; when KRA has approved you, tick that, choose Live and Save and connect. Choose a default KRA item class and switch on sending every sale.
- Set each product's tax in Inventory (VAT 16%, exempt, zero-rated...), and switch on VAT-registered in Settings if you are.
- Check a receipt: once KRA accepts a sale, its receipt shows KRA's invoice number, signature and QR code. Sales still waiting or rejected never show on customers' receipts: Integrations > KRA eTIMS shows them, with the reason, and sends them again.
- API keys and webhooks (Premium): connect other software. See DEVELOPERS.md.
← Accounting books (Business plan and above) · All topics · Installing BlueDuka and working offline →
Download the whole guide (PDF)
Need help? Call or WhatsApp the BlueDuka team on +254 727 177 155.